

A product was given for review for my honest opinion. No other compensation was given.

It is Spring which means gardening, watering your lawn and garden, and lots of rain!!! What better way to save on water bills, use the good rain God has given us, and keep your plants and grass hydrated through the heat than with a rain barrel!
This is something I have always wanted to do but haven't had the chance until this Spring when we were finally settled into our new house! Every time it rained, I was sad I didn't have a way to conserve the free (and healthier for your plants!) water to use in my garden!
A rain barrel is the perfect solution and I couldn't wait to get started! The first order of business: getting a rain barrel!
Where to Get a Barrel:
Now please keep in mind, there are many ways to make a rain barrel and many places to get a rain barrel: it all depends on your location, how much you want to spend and how you want it to look!
I was originally going to find a nearby factory (we have a mayonnaise factory nearby with food-grade barrels) to get our barrel and just convert it to a rain barrel, but when I saw the super awesome-looking rain barrels all ready to use from The Rainbarrel Depot, I instantly pictured one on the side of our house!

The Impressions rain barrel collection reinvents how you harvest rain water. This 50 gallon Palm design is sturdy and one of the most eye-catching rain barrels on the market. The most captivating feature is its appearance which emulates the rough texture of a palm tree trunk. The top also includes the Good Ideas original, integrated overflow channel. This channel automatically diverts all overflow water to the front of the barrel and keeps your foundation from flooding. The large opening which can be used for 2x3 or 3x4 downspouts is covered with a soft, fine mesh, plastic screen. This screen keeps out heavy debris and insects for your piece of mind. Also included with the barrel are the two, offset spigot locations. Now you can use a five gallon bucket or hose simultaneously without issue. Or use the second spigot as an overflow into a second barrel. Who knew you could have so many features in a rain barrel?
It is the perfect size - not too big but big enough to hold enough water to water our garden and plants!
Next, thing we had to figure out is how to install it!
Other Accessories to Get
I will be honest, when I first got the rain barrel, I was a little overwhelmed about how to install it! But I am here to tell you IT IS NOT THAT HARD and with the directions, it didn't take long and was really easy to do!
The BIGGEST thing to have along with the actual Rain Barrel, is a Diverter Kit! You can find a great Do-It-Yourself Kit Here. It contains everything you need to make your rain barrel!

The diverter eliminates having to cut your down spout. It also eliminates having an overflow hose and creates a sealed system, eliminating mosquitoes and debris from entering your rain barrel. It works with almost all plastic barrels, heavy-duty trashcans, and repurposed plastic drums.
They have removed all of the guesswork and included all the parts! All you need is a drill. The patented Flexi-Fit diverter system taps directly into your down spout, eliminating cutting your downspouts!
It makes a water saving rain barrel in minutes, not hours.
So now that you have your Rain Barrel and your Diverter Kit, head outside with me and find a great place to put your rain barrel!


1. The hole must be cut at the correct height for the diverter to work
properly.
2. If the hole is cut too low, the barrel will not fill properly.
3. If the hole is cut too high, water will overflow from the barrel rim
(this only applies to open top barrels).
Since we have a closed top container, we drilled the hole at the same level as our hole on the barrel.
If the barrel has an opening lid, the center of the diverter hole must be drilled 2.5” (65mm) below the level of the rim of the barrel to prevent water from leaking from the lid seam. The diverter will not work if it is placed below the level of the water inlet on the barrel.


Just wrap around the spigot and then screw it on in both locations!


And there you go! You have a complete RAIN BARREL! You did it!! It wasn't so bad, was it!!??

I am loving our Rain Barrel and am so happy with the location, how it looks, and how easy it was to install! Now I can't wait for it to rain, fill my barrel and then I can use the free water to water my garden!


Oh, and I have to plant my little garden on top! That will be the hardest part...figuring out what to plant in the top of my rain barrel!!! :)


They have removed all of the guesswork and included all the parts! All you need is a drill. The patented Flexi-Fit diverter system taps directly into your down spout, eliminating cutting your downspouts!
It makes a water saving rain barrel in minutes, not hours.
So now that you have your Rain Barrel and your Diverter Kit, head outside with me and find a great place to put your rain barrel!
Find a Place for Your Rain Barrel
In order to get the most out of you rain barrel, the location you put it is important. You want to make sure you put it close enough to whatever you are going to be watering the most (like your garden, pots, or flowers).
We are going to be watering our garden the most so we picked the downspout closest to the garden.

You also want to pick a flat spot. Luckily the downspot sat next to a little side flower garden we had so it was mostly flat already. We had to dig up a plant and pack down the earth a little bit but overall very easy!

Then you want to make sure you put the water barrel up on a little bit of a lift, like blocks, wood, etc so that you can use gravity to get some water pressure when attaching a hose. We decided to use some cinder blocks we had sitting around and it worked great!
Make sure you get your barrel set up on the elevation you are using BEFORE installing because otherwise it won't line up right with the diverter!
Now that you have the barrel set up and in the place you want it, you are ready to begin the installation process!!

How To Install Rain Barrel
You want to make sure you have your diverter kit ready now. This is his time to shine! And remember, depending on what barrel and diverter kit you are using, these directions may vary. Again, we are using the close topped Good Ideas Impressions Barrel and Earthminded Do-It-Yourself Rain Barrel Kit.
Make sure to read ALL the directions before starting! It will make putting together your rain barrel easier and you will prevent any leaks or drainage issues!

So first you start with drilling the hole in the side of the barrel. We drilled our hole right below the top of the barrel with the great hole saw bits that were included in our kit! (Once again, I LOVE That all WE needed was a drill to install this!!!)


The hole was drilled relatively easily and then we were set to put in the threaded rubber seal into the hole. Hint: Pinch the seal into a “U” shape for easier insertion. That worked really easily!


Once that is in, you are ready to drill the hole for the diverter into your downspout! Once again everything for that was included!
Now this is where you have to really make sure you have read the directions on your diverter kit because determining where to drill your hole in the downspout varies depending on what kind of barrel and downspout you have.

The Flexifit™ diverter redirects water from your downspout to the barrel, and automatically passes water through the downspout when the barrel is full of rainwater.
1. The hole must be cut at the correct height for the diverter to work
properly.
2. If the hole is cut too low, the barrel will not fill properly.
3. If the hole is cut too high, water will overflow from the barrel rim
(this only applies to open top barrels).
Since we have a closed top container, we drilled the hole at the same level as our hole on the barrel.
If the barrel has an opening lid, the center of the diverter hole must be drilled 2.5” (65mm) below the level of the rim of the barrel to prevent water from leaking from the lid seam. The diverter will not work if it is placed below the level of the water inlet on the barrel.

It was a little harder and took a little longer to drill those hole through the metal but DON'T punch it through! Just be patient and do it nice and slowly! Also, it's a good idea to wear safety glasses and gloves!

Then once you have the hole drilled, insert your diverter into the hole.

THERE YOU GO! The hardest parts are done!!

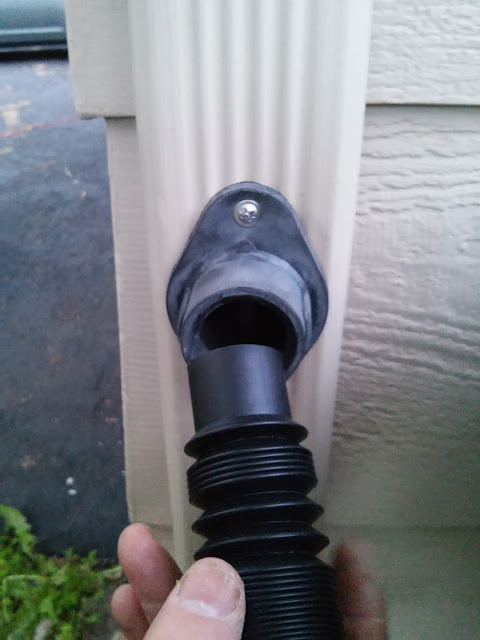
Then connect the barrel to the downspout with the connecting hose!


And there you go! Your water barrel is ready to fill up with rain water and water your garden, plants or grass!!!

A Couple More Things Before You Are Done:
Ok, just a couple more little things before you are completely done. You need to put on the spigots with the tape that is also included!

Just wrap around the spigot and then screw it on in both locations!


And there you go! You have a complete RAIN BARREL! You did it!! It wasn't so bad, was it!!??


Oh, and I have to plant my little garden on top! That will be the hardest part...figuring out what to plant in the top of my rain barrel!!! :)

So, as you see, it isn't very hard to install a rain barrel! Just be prepared, read the directions, have a great barrel and diverter kit on hand, and find a level, elevated location!
Now go enjoy your free water and lower water bills this summer!!!
* Thank you to The RainBarrel Depot for their product for review! Disclosure - This product was given for review for my honest opinion. No other compensation was given.*


0 comments:
Post a Comment